🚀 Crafting Custom CI/CD in Bitbucket Pipeline


Introduction to CI/CD 🚀:
In the world of making computer programs, we’ve got some cool practices that help us work better. Let’s talk about three important buddies: Continuous Integration (CI), Continuous Delivery (CD), and Continuous Deployment (CD). They’re like a trio of superheroes making sure our code is top-notch and reaches users smoothly.
Continuous Integration (CI) 🤖:
Imagine a big team working on a project. CI is like a magical spell that helps everyone work together without causing chaos. It’s all about team members regularly putting their work into a shared space. This helps us catch mistakes early and make sure our code works well together. CI buddies help us compile code, check if everything looks good, and run tests to make sure nothing is broken.
Continuous Delivery (CD) 🌐:
Now that CI has made sure our code is solid, CD takes the stage. CD automates the whole process of getting our code ready for the world. It’s like a helpful robot that does everything from putting our code in a pretend live environment to running tests to see if it’s ready to go live. CD buddies also help with things like getting our code to a test server, trying it out with real users, and packaging it up for release.
Continuous Deployment (CD) 🎸:
CD is the rockstar of automation. Once our code has passed all the tests, CD takes it straight to the big stage — the live servers where real users can see it. It’s like magic — every little change we make gets automatically sent to the live environment. This way, users always get the latest and greatest stuff without us having to do anything manually 🎸🌟.
1. Create a simple test-driven development React/Node js project
First, create a BitBucket repository. Then we need a barebone test-driven development (TDD) project as our code base so for that you can create simple react app using “npx create-react-app my-app” command. Also create one Dockerfile for same like below.
FROM node:13.14.0

WORKDIR /app

# Download all dependencies.
COPY package*.json ./
RUN npm install --no-optional
# RUN npm audit fix
RUN npm cache clean --force

# Copy the source from the current directory to the Working Directory inside the container
COPY . .

# Command to run the executable
USER root
ENTRYPOINT ["npm", "run", "start"]
2. Set up the BitBucket Pipeline
Step-1 : Generate ssh key into repo variable.
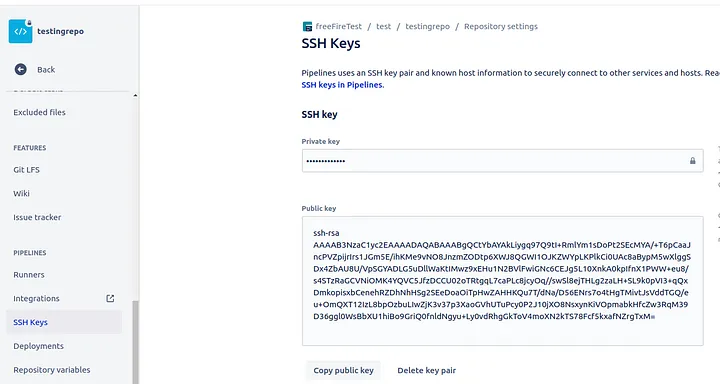
step -2 : Add this public key in remote server authorized_key file where you want to run your application.

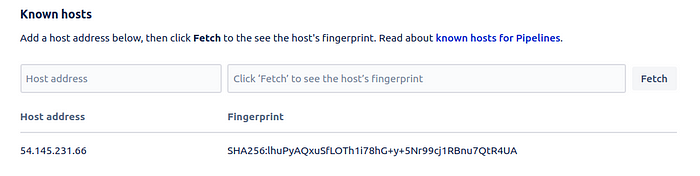
step-3 : Create a Known hosts using remote server public IP address first click on fetch and then add it like below.
step -4 : Create Repository variables accordingly to your requirement. Here i have created “DOCKER_PASS”, “DOCKER_USER”, “SSH_USER”, “SSH_HOST”, “SSH_KEY” for pushing image to docker and ssh to server and run compose file.
3. Create Bitbucket pipeline
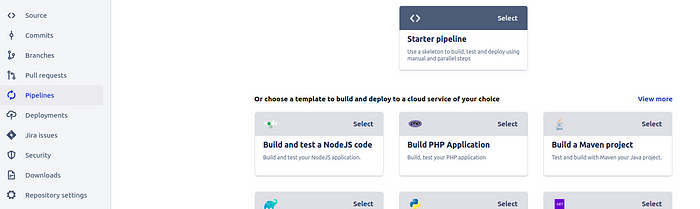
click on “starter pipeline” and add below like this.
image: atlassian/default-image:4.20230906

options:
  docker: true

pipelines:
  branches:
    main:
      - step:
          name: create image and push to docker hub
          script:
            # prepare data
            - export IMAGE_NAME="GIVE_YOUR_IMAGE_NAME"

            - export VERSION=$BITBUCKET_COMMIT_$BITBUCKET_BUILD_NUMBER

            - echo "${DOCKER_PASS}" | docker login --username ${DOCKER_USER} --password-stdin

            - docker build -t ${DOCKER_USER}/${IMAGE_NAME} .

            - docker tag ${DOCKER_USER}/${IMAGE_NAME}:latest ${DOCKER_USER}/${IMAGE_NAME}:${VERSION}
            - docker push ${DOCKER_USER}/${IMAGE_NAME}:latest
            - docker push ${DOCKER_USER}/${IMAGE_NAME}:${VERSION}

          services:
            - docker
      - step:
          name: SSH into Remote Server and run compose file
          script:
            - export SSH_KEY="$SSH_KEY"
            - export SSH_USER="$SSH_USER"
            - export SSH_HOST="$SSH_HOST"

            # Copy the SSH key to a temporary location
            - echo "$SSH_KEY" > ~/.ssh/id_rsa
            - chmod 600 ~/.ssh/id_rsa
            - ssh-keyscan -H $SSH_HOST >> ~/.ssh/known_hosts

            # SSH into the remote server and perform actions
            - ssh -o "StrictHostKeyChecking no" -i ~/.ssh/id_rsa $SSH_USER@$SSH_HOST "echo 'connecteddd'"
            - ssh -o "StrictHostKeyChecking no" -i ~/.ssh/id_rsa $SSH_USER@$SSH_HOST "cd /home/ubuntu && docker-compose pull &&sudo docker-compose down && sudo docker-compose up -d"
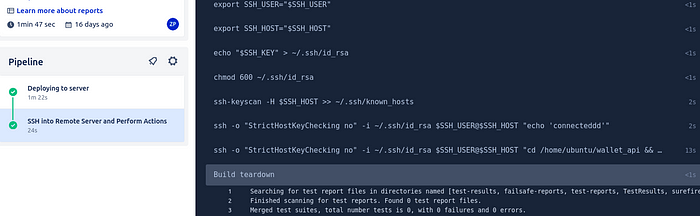
Once you click the Commit file button, BitBucket will immediately kick off the first run. If everything runs smoothly, you should see green check marks next to our three steps inPipeline panel.
Conclusion:
In a nutshell, CI, CD, and CD are like our coding buddies that make sure everything runs smoothly. They help us catch problems early, automate boring tasks, and get our code to users without a hitch. These practices might sound fancy, but they’re like superheroes that make our coding lives easier and more fun. As we embrace these buddies, we’re gearing up for a future where our code is not just continuous but also super awesome. 🌐✨
If you found this article helpful, please don’t forget to hit the Follow and press heart buttons to help me write more articles like this.
**Thank You 🖤
You can contact me on: LinkedIn